Wednesday, January 30, 2013

Aussie, Aussie, Aussie!

We Kiwi’s have always been good sports so in the spirit on Australia Day I made the Aussie’s in my life something special, just for them!


I started with vanilla and chocolate cupcakes with the flattest tops so the flag would look even. Three by four cupcakes are great dimensions for a realistic look and the most cupcake carriers’ holds are twelve on each tier so easy to transport and present as a whole.


First I lightly frosted the tops.


Then I covered the tops with blue fondant. I can’t stress this enough; use powder or gel colouring! I haven’t had a chance to buy either so I had to use a heck of a lot of colour to get the shade I wanted.


Since the union jack is red on white the white went on first.  


Then the red; super easy.


As for the left over cupcakes I tinted some frosting light teal and in keeping with the Australian theme I finished them off with more flags. 


Friday, January 25, 2013

Purple Macarons and Vegan Delights

A friend is having her baby shower in a couple of weeks and instead of pink she is going with purple. Since I volunteered to handle the sugary goodies for the shower I have started experimenting with purple goodies.

First off I started with macarons; I used my usual recipe but tinted it purple. Since I used liquid food colour I couldn’t get the colour as vivid as I wanted because large quantities of liquid would make the mixture too runny. Mental note; use either gel or powder colour. Another thing to note, not sure if I’ve mentioned this before, but in the baking process you loose colour so I recommend making them slightly brighter than you’d like. I filled half with the purple butter cream that I had left over from the cupcake bouquet and the other half with white chocolate ganache. Unfortunately I completely forgot to take a finished shot of the macrons but this is how they looked straight out of the oven.


In keeping with the experimentation theme I thought it might be nice to have a vegan option just in case some guests are that way inclined. I’ve always been scared to do vegan cupcakes and I figured out why. The reason I liked this recipe by Hello Giggles  is because I already had everything in the pantry except applesauce, which after much research I discovered that I could just substitute with bananas. I suppose this goes without saying but be very careful that all your products are vegan; unbleached flour but also unbleached sugar. The lady at the organic store recommended this brand of sugar; its super fine so it works well as icing sugar as well.
 
I made half the batter with a few tweaks of my own and maybe this is where I went wrong. I omitted the red food colouring altogether and since the recipe called for cocoa powder instead of making red velvet I thought chocolate cupcakes would work better with purple frosting. The other large adjustment I made was using half vegetable oil and half cacao butter. My logic was that cacao butter when melted works the same as oil and since this had turned into a chocolate cupcake anyway what could possibly be the harm. Well the batter looked alright and tasted great.


 This is what they looked like out of the oven.


The cupcakes were really dense and heavy and even though I did the toothpick test several times a few of them were still a little underdone. The ones that were done had more of a consistency of pudding then cupcake. To make matters worse, and I am not sure if this is because a few were under baked or the cacao butter or the heat, but the next day a few of the cupcakes dripped oil when you bit into them. Oh and the horror didn’t stop there; I accidentally bought the wrong vegan cream cheese, not Tofutti like I usually do, and I had to use close to four times as much vanilla extract trying to hide the taste which made the frosting runny and difficult to pipe! All in all very challenging indeed; maybe next time I’ll stick to the recipe. This is the end result;


Friday, January 18, 2013

Cupcake bouquet!


So a friend from work is leaving and she will be sorely missed and what better way to say we'll miss you then with a bouquet. But not an ordinary bouquet, no that would be too easy, a cupcake bouquet! I got this idea while pouring through hours of YouTube videos about cupcake and this seemed like a good occasion.


What holds the bouquet together is craft foam; covered in glad wrap and reinforced to whatever the bouquet in going to be in, in my case a basket. However make sure you reinforce the craft foam securely enough so it can hold the weight of the cupcakes. 


Then I started with vanilla Bailey's cupcakes and because it was a thirty degree day I figured buttercream was the way to go for frosting. Now I've never made buttrtercrem before but I found this recipe from My cupcake addictions; it was simply, easy to follow and tasted great. The only thing I did differently was tint mine pretty purple! I was a bit over zealous and made the buttrtercream hours ahead of time, just incase I screawed it up and another batch was required, so I reluctuntly refrigerated it. Luckily all I needed was to nuke it in the microwave for ten seconds and you're good to go. To pipe roses I used the equivalent of a Wilton 2d tip which I got in my cake decorating magazine. This is also the first time I've piped buttercream and its a lot firmer than frosting so my hand cramped a little but I got there in the end. The roses need a lot more practice but the end product was still pretty.


The fondant rose toppers were a first attempt too. I followed the gourmet cupcake company instructions as well as one by poetry on a plate. Both are easy, again, all you need is practice.
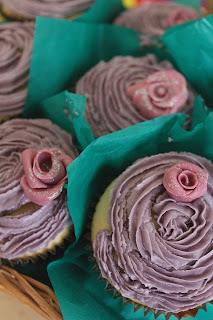


To attach the cupcakes to the foam cut a bamboo skewer in half. Then with the point end poke a hole in the bottom of the cupcake making sure that you don’t pierce the top. Then poke a hole in the foam and attach the skewer and then the cupcake on top of it. I suggest not attaching the cupcakes at too much of an angle just in case. You can decorate and then attach the cupcakes or vice versa it’s entirely up to you. I attached and then decorated purely because I didn't know how the cupcakes would hold and as it turns out it held fine.To make it look more realistic I cut square green tissue paper and poked it through the skewer before I attached the cupcake so it looked like leaves.

And then just coz I could and also because they look like rose buds, I added chocolate covered strawberries to the mix. 

Then all it took was some purple cellophane and a card to complete the look!


Sunday, January 13, 2013

And a Very Happy New Year To You!


Now that all the sugar and liquor has worn off from the silly season and I can coherently type again I can show you all my sparkly New Years creation.

I started off with two cakes, vanilla Frangelico and chocolate Kahlua. Hey, it was New Years Eve after all. I added the liqueurs in with the milk in the baking process, just enough to infuse the cake. After it was cooled I leveled it and filled and crumb coated it with vanilla frosting. I only used frosting because I had some left over and figured it would keep the cake moist.  


 After filling and crumb coating I suggest chilling it for a little bit just so it firms up a bit especially if you are working in the heat like I was. I finished it with white chocolate ganache.

Now I am not going to lie, this was my first attempt at assembling and decorating a two-layer cake and yes it was a challenge. Instead of pouring the ganache I let it firm up a little until it was butter cream consistency and spatulated it on. The cake pops were made from off cuts when I leveled out the cake.The stars and hearts I cut out from purple fondant, dusted with edible glitter and used craft wire to hold them up. The lollipop sticks I used for the cake pops are hollow so they were perfect to stand my sparklers. I also added a few sparklers to the cake too, just for kicks!   


Sunday, December 23, 2012

Crackers!


Again I know not baking related but I am super proud of these. I got a make your own Christmas cracker kit from Spotlight and made they for my little brother and my partner!

Edible presents!


I made these to take into work; chocolate chip cookies (they are Santa’s favourite) and peppermint macarons with white chocolate ganache filling.

The cookie recipe I got from The Joy of Baking. This is my go to recipe and the macaron recipes I got from Cristina Valencia and the ganache recpie I got from Inspired by Michelle Cake Designs and nicely packaged in a box thanks to Ikea!   


Merry Cupcakes

See it’s gotten to the point where if I am invited to someone’s place, for whatever reason, I am expected to bring baked goodness! So afternoon drinks with Christmas cupcakes!

These gorgeous cupcake papers were a Christmas present from my partners’ sister. They look great with the vanilla cupcakes.


Aren’t they beautiful!
Instead of having all the same cupcakes the same I did different toppers in lots of three. "The Ho Ho Ho’s” were two pieces of fondant in complementary colours or in this case Christmas colours that were layered. On the top layer I cut out the letters so the bottom colour would come through.
 

As for "the Santa Hats” I moulded them out of fondant and pipped frosting to look like hair and attached them on. Just a tip if you are going to be colouring your own fondant us a gel or powder colour. The colours are a lot more vibrant and you don’t make the huge mess that I did with the liquid colour. Also just for a bit more whimsy I dusted the white with lustre dust.  
 
For “the presents” I had square silicone moulds that I drizzled with green chocolate first and then filled in with milk chocolate. When it had set I pipped on a little bow on each. To make sure they stayed I dipped the whole cupcake in red vanilla frosting and popped on the topper straight away.   
I had some fondant texture mats which I got with my cake decorating magazines, which I thought, would be great as baubles toppers. I rolled out white fondant and pressed the mat on until it imprinted. Then I cut out the fondant into a circle that would cover the top of the cupcake and attached it with royal icing. The swirl print ones I dusted with lustre dust and the diamond one I placed a silver cachous  on the corners.


Aother thing I got in my cake decorating magazines was this one stencil that looked like I snowflake. With very thick royal icing I stencilled on the snowflake on rolled out fondant. After it had dried I cut the right size circles out and put them on top of the cupcake using royal icing to hold it down. By this stage the fondant will harden so it wont mould to the cupcake but that’s ok, It still looks pretty.
 
Lastly “the star atop the tree”, I used the same impression mat as the baubles but this time cut out little stars. Green royal icing made the top of the tree (just a simple star tip swirl will do) and when it was about half dry I put the stars on.
 
Merry Cupcakes!